My packet maker, Ginger, is a big-time stamper, and so it makes sense that my swap packet has a lot of stamped images. See, you don’t actually have to give someone the stamp for them to use the image. You can stamp the images on card stock and share them. Makes total sense, but for some reason this never occurred to me until I starting hanging out with Ginger. (Did you know there are digital stamps? Of course there are.) I haven’t done a lot with stamps even though I have quite a few. [There was that time I made my own stamps out of all sorts of weird things like pine needles and soda cups and clay pressed into air vent grates, but that’s sort of different.] This month’s swap I decided I’d take some stamped images on my journey out of my comfort zone.
While there are a billion different colors of stamp pads out there, stamped images definitely aren’t limited to just the one color that the stamp is stamped in. That is definitely an option, as is using markers to color onto the stamp to make the image. But as long as you are just stamping, there’s all that white space in the images just begging for color. Ginger and Kristy (another big-time stamper) spend a lot of time coloring, and while I like coloring myself, I generally prefer the crayon-in-book sort. Not only is my stamp-coloring-in experience newbie level, so is my stamp-coloring-in marker collection.
Although our swap cards don’t have to be the same for all 6 cards we make each month, I personally like it when the ones I am making are. I didn’t have six of any one image, but I had two very similar images with three copies each. I colored the images, and with each one finished my appreciation grew for the skill and work Ginger and Kristy (and other stampers) put into their colored images.
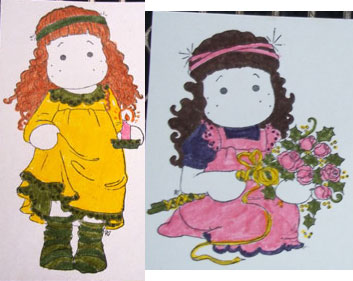
The colored images were okay, but I was deeply bothered by the vampire-pale skin the girls had. My marker collection didn’t have anything remotely skin toned that wouldn’t cover up the face details. I pondered colored pencils, but somehow mixing pencils and markers seemed a lot like putting oregano on strawberry cake. (Anya has been bugging me to make strawberry cake for about two weeks. But not with oregano.) The images sat for about a week until I had a little bit of time to myself, and then I started heating up the kettle.
I decided to give my painstakingly colored gals a tea bath. I thought the markers I’d used were non-water-soluable, but since I didn’t have any images to spare I didn’t want to take a chance. I used my keen experimenting skills and created some sample pieces to use with different tea-staining methods.
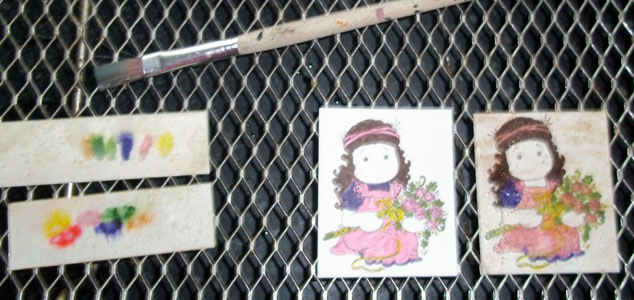
In this image, the rainbow strip on the bottom was directly submersed into the tea. The colors ran a lot. I tried another strip where I blotted the tea onto the paper with a paintbrush. The colors still ran, but the borders seemed to hold better. I tried using the paintbrush blotting on one image, and although the colors ran more than I wanted, I was sort of committed. By the time I’d finished all six pieces, I was feeling better about how the images looked. In fact, I was really digging how the colors washed out so the stamped details below came through. I also liked how the borders ran together and how everything was softer and less bright-n-fresh-n-new looking.
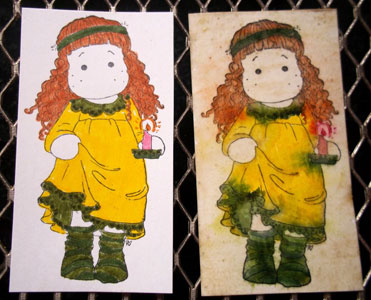
After the images dried, they were a bit curled. I roughed up the edges with my edge-distressing thingy (does it have a real name?), and I pondered leaving the images like that. But, it just didn’t seem quite right. I put the images back in the bag and pondered some more. And went to Michael’s. And bought Modge Podge. I don’t think I’ve used Modge Podge since I was a kid and my Mom helped me decoupage some favorite post cards onto wooden plaques to hang on the wall. I put the images onto some orange card stock and then modged over the whole thing.
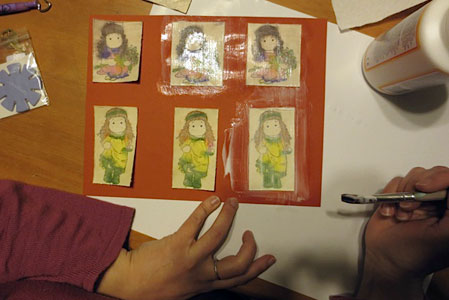
When the Modge Podge dried, I finally felt like the images were done. Phew. I pulled out some patterned paper from my swap packet and then dug into my collection for blank cards, some twine (that came with the tags I bought for Month 1), pattern-cutting scissors, and the corner rounder. Wham! Bam! Tie! Glue! Snip!
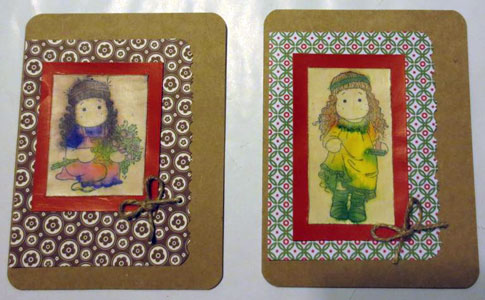
I handed out four of the six cards at our crafty day yesterday. The cards are definitely more awesome in person than in these not-so-awesome photos. Everyone seemed to like them. At least, no one used their card as a coaster or a blotter or a shim under a wobbly table leg.
So, that’s Month 2 done and here’s March only a wee bit done. Dare I start Month 3, or should I wait to spread out the fun?