After our holiday tag swap, my crafty group decided we’d keep the swapping going. Because we are all busy folk, and we don’t see each other as often as we like, we decided to make one yearlong swap instead of trying to set up swaps each month or season or whenever we thought of it. Those of us who had swapped material packets last time seemed to have made that look sooo awesometacular that all 7 folks participating in this swap wanted to do it, too.
For this, the First Annual Queen Bee YearLong Swap, we all switched packets. Each month each crafter picks an item off the list (e.g., birthday card, thank you card, gift tag), makes six of those item, and delivers them to the other six folks in the swap.
Here’s my packet from the awesome Ginger:
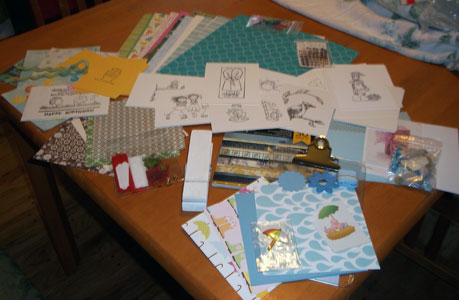
Ginger and I have different styles, so while everything in this packet is pretty, most of it isn’t stuff I would normally pick out on my own. At first this made me feel a bit uncomfortable, but then I realized this was what I wanted! A chance to try some new things! I also realized that I didn’t have to take the packet literally. That is, I didn’t have to actually use the physical items from the packet to use the packet. (Huh?) I found several pieces of paper in the packet that inspired me, but I didn’t want to use the actual paper. Instead, here is what I did.
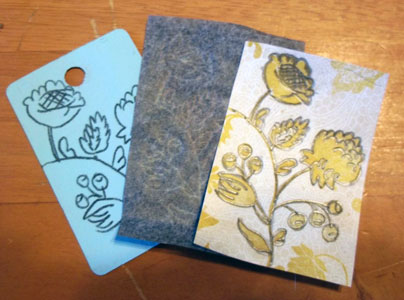
First, I used acrylic craft paint to sort of rough coat some store-bought gift tags a pale blue. Then, I found the part of a piece of patterned paper from my packet that had some really pretty flowers on it. I cut out just that part, and then, using carbon paper, I transferred the flower image onto the tags.
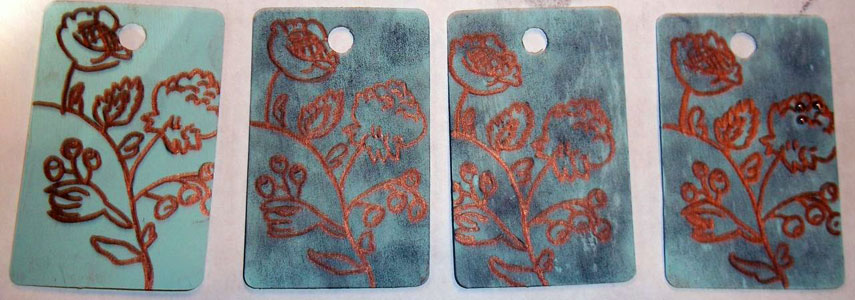
There was a part of me that really liked how this looked all on its own but not for this project. I could see myself using this technique again somewhere else and leaving it with just the carbon image. For this project, I bought a copper metallic paint pen and traced over the transferred image. Helpful hint, use a sharpish pencil to transfer the image if you want to cover with a paint pen. Because my pencil grew dull, the transferred image was a bit wide, and the paint pen did not completely cover it in all places. It looked a bit sloppy. Plus, the tag still seemed a bit bleh. So, I dug out my distressing kit next (which isn’t distressing in of itself). I put black distressing ink over top of everything, and that helped the leftover carbon bits blend in. Then I used sandpaper to rough everything up and sort of mix it together so it looked more put together. Finally, I put a little bit of bling on the tags with some little teeny pearly stickons that were in my packet.
The tags I’d bought came with twine, but the finished tags called for something a bit more elegant, so I tied them off with brown ribbon from my stash.

I’m not totally in love with the actual final product because they seem a bit rough to me. Sort of like I needed a bit more practice with what I was doing before making a final product. I really liked the image transferring with the carbon paper, and I definitely want to do that again.
We do have different styles. I took items from your packet and incorporated it into my own style. Some items I am not sure how to use. So hopefully we will just use our style and get inspiration from our packages! Super cool tag Carol!
Hey Ginger, your comment made me laugh. In my head I see you pulling stuff out of the packet and saying, “WHAAAAAAA?” I’ve started on my item for next month, and I’ve been coloring stamped images, which is something I hardly ever do. It’s been mostly fun, and it is giving me a huge appreciation for the coloring work you do!